顯示具有 cloud-init 標籤的文章。 顯示所有文章

2023年8月4日 星期五

Ubuntu Server autoinstall cloud-init config file reference

Ubuntu Server autoinstall cloud-init config file reference


在使用cloud-init建立Ubuntu Server autoinstall ISO過程,需要製作autoinstall的user-data。參考ubunt的Automated Server installer config file reference產出個人的user-data


user-data項目說明

user-data為yaml檔,開頭註明為#cloud-conifg
#cloud-config

# autoinstall 設定項目
autoinstall:
  apt:
    disable_components: []
    fallback: abort
    geoip: true
    mirror-selection:
      primary:
      - country-mirror
      - arches:
        - amd64
        - i386
        uri: http://archive.ubuntu.com/ubuntu  
# uri為apt update sites, 可以依需求更改,資料會寫入/etc/apt/sources.list
      - arches:
        - s390x
        - arm64
        - armhf
        - powerpc
        - ppc64el
        - riscv64
        uri: http://ports.ubuntu.com/ubuntu-ports
    preserve_sources_list: false

  codecs:
    install: false
  drivers:
    install: false

# 設定系統帳號, 密碼為加密, 可以使用mkpasswd產出。
  identity:
    hostname: u22
    password: $6$jGYK2yqL/ERewR7A$kGm5GztrXrQPb7L3wa0VAMeaWj/UuJcUVB/M.T.fOkaV8SvFIMdULOfKHyRDkB..85yVsDPJrtpQ3bsj3Rtnt.
    realname: bee01
    username: bee01
  kernel:
    package: linux-generic

# 指定鍵盤
  keyboard:
    layout: us
    toggle: null
    variant: ''

# 指定語言
  locale: en_US.UTF-8

# 網路設定,網路卡依實際名稱設定。設定方式為netplan,可以參考設定。
  network:
    ethernets:
      ens160:
        dhcp4: true
    version: 2

# 指定安裝系統,可以設定ubuntu-server 或 ubuntu-server-minimal。
  source:
    id: ubuntu-server
    search_drivers: false

# 安裝open SSH server
  ssh:
    allow-pw: true
    authorized-keys: []
    install-server: true

# 硬碟分區設定,可以依實際狀況調整
  storage:
    config:
    - ptable: gpt
      path: /dev/sda
      wipe: superblock-recursive
      preserve: false
      name: ''
      grub_device: true
      type: disk
      id: disk-sda
    - device: disk-sda
      size: 1048576
      flag: bios_grub
      number: 1
      preserve: false
      grub_device: false
      offset: 1048576
      path: /dev/sda1
      type: partition
      id: partition-0
    - device: disk-sda
      size: 42946527232
      wipe: superblock
      number: 2
      preserve: false
      grub_device: false
      offset: 2097152
      path: /dev/sda2
      type: partition
      id: partition-1
    - fstype: xfs
      volume: partition-1
      preserve: false
      type: format
      id: format-0
    - path: /
      device: format-0
      type: mount
      id: mount-0

# 指定swap大小,使用檔案格式
    swap:
      filename: /swap.img
      size: 4G
      maxsize: 4G

# 安裝 packages, 需確定安裝過程是可以連接網路, 會自動安裝。
# 如果沒有對外網路,自動安裝過程會出錯中斷。
  packages:
    - chrony

# 主機時區設定
  timezone: Asia/Taipei

# 自動安裝前執行的動作,還沒有想到作用
# 可以參考後面示範
  early-commands:
    - mkdir /data1
    - touch /data1/early-commands.txt

# 以上設定都自動安裝後,在自動重新開機前執行的動作
# 預計要執行的指令需 curtin in-target來執行,新的硬碟在安裝過程是掛載至/target
# 以下測試是在/ 建立data2目錄,在/data2目錄建立late-commands.txt檔案
# 可以參考後面示範
  late-commands:
    - curtin in-target --target /target mkdir data2
    - curtin in-target --target /target touch data2/late-commands.txt

# 安裝完成後,第一次自動重開機後,使用rnncmd來執行的動作
# 以下測試是在/ 建立data3目錄,在/data2目錄建立runcmd.txt檔案,並停用開機執行ufw service 
# 可以參考後面示範
  user-data:
    runcmd:
      - [ mkdir, /data3 ]
      - [ touch, /data3/runcmd.txt ]
      - [ systemctl, disable, ufw ]

  updates: security
  version: 1

安裝示範

early-commands
usr-data-early-commands


late-commands
usr-data-late-commands


runcmd
usr-data-runcmd


2023年7月6日 星期四

Ubuntu Server 22.04 cloud-init autoinstall

Ubuntu Server 22.04 use cloud-init autoinstall


Ubuntu 從20.04開始使用cloud-init 製作自動化安裝程序,不再使用Debian Preseeds。後續將使用cloud-init配置安裝設定,再通過 NoCloud 安式提供用戶資料。

測試環境

VMware esxi 7.0u2
ubuntu-22.04.2-live-server-amd64.iso

建立ISO過程使用ubuntu-22.04.2-live-server-amd64.iso示範

Ubuntu Server Autoinstall ISO制作流程

1.安裝相關套件
# sudo apt install p7zip-full wget curl xorriso vim
安裝相關套件


2.下載 Ubuntu Server 22.04.2 ISO
# wget https://releases.ubuntu.com/22.04.2/ubuntu-22.04.2-live-server-amd64.iso
下載 Ubuntu Server 22.04.2


3.將Ubuntu Server ISO 解壓縮至目錄 source-files
# mkdir ~/source-files
# 7z -y x ubuntu-22.04.2-live-server-amd64.iso -osource-files
將Ubuntu Server ISO 解壓縮至目錄 source-files


4.移除Ubuntu Server ISO 現有 MBR 和 EFI 分區(1-Boot-NoEmul.img 2-Boot-NoEmul.img)
# cd source-files/
# mv  '[BOOT]' ../BOOT
移除Ubuntu Server ISO 現有 MBR 和 EFI 分區映像


5.新增ISO開機Autoinstall 選項
新增ISO開機Autoinstall 選項

# vim ~/source-files/boot/grub/grub.cfg

開機選項指定cloud-init使用nocloud,直接存取iso的/server目錄資料(user-data)
menuentry "Autoinstall Ubuntu Server" {
    set gfxpayload=keep
    linux   /casper/vmlinuz quiet autoinstall ds=nocloud\;s=/cdrom/server/  ---
    initrd  /casper/initrd
}
grub.cfg add autoinstall


6.建立cloud-init的user-data和meta-data
create user-date meta-date
# mkdir ~/source-files/server
# touch ~/source-files/server/meta-data
# vim ~/source-files/server/user-data
user-data 為標準yaml格式,可以依需求編輯。也可以在已安裝的Ubuntu Server 主機中獲取,位置為 /var/log/installer/autoinstall-user-data,直接更名為user-data,放置於~/source-files/server
autoinstall-user-data


可以直接使用user-data,分別依BIOS或UEFI檔案下載,更名為user-data使用

7.驗證的user-data和meta-data
可以使用 cloud-init schema --config-file 驗證user-data和meta-data
# sudo cloud-init schema --config-file server/user-data
cloud-init schema --config-file server/user-data


# sudo cloud-init schema --config-file server/meta-data
cloud-init schema --config-file server/meta-data


在驗證meta-data過程時,有發生error,直接依需求加入"#cloud-conifg",就無error

8.製作安裝 Ubuntu Server 22.04 Autoinstall ISO
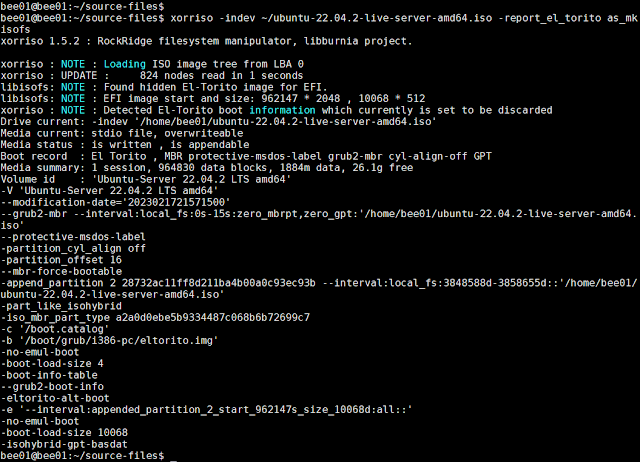
列出ubuntu-22.04.2-live-server-amd64.iso 資料
# xorriso -indev ~/ubuntu-22.04.2-live-server-amd64.iso -report_el_torito as_mkisofs
# xorriso -as mkisofs -r   -V 'Ubuntu 22.04 LTS AUTO (EFIBIOS)'   -o ../ubuntu-22.04-autoinstall.iso   --grub2-mbr ../BOOT/1-Boot-NoEmul.img   -partition_offset 16   --mbr-force-bootable   -append_partition 2 28732ac11ff8d211ba4b00a0c93ec93b ../BOOT/2-Boot-NoEmul.img   -appended_part_as_gpt   -iso_mbr_part_type a2a0d0ebe5b9334487c068b6b72699c7   -c '/boot.catalog'   -b '/boot/grub/i386-pc/eltorito.img'     -no-emul-boot -boot-load-size 4 -boot-info-table --grub2-boot-info   -eltorito-alt-boot   -e '--interval:appended_partition_2:::'   -no-emul-boot   .
make autoinstall iso


9.使用VM驗證開機


參考資料